
Running a server (advanced topics)
This section will go over some more advanced topics on running your server. Do not try anything here that you do not understand!
Contents
- Server administrators
- Server commands
- Cheat commands
- Multiple servers on a single Sven Co-op install
- Running a server as a service
- HTTP downloads for your Sven Co-op server content
Server administrators
Sven Co-op has a (minimal) framework for server administrators and owners to get some representation of their status and some basic functionality to help control the game session.
These players are given this status by declaring their Steam ID within the file adminsfile (pointing to "admins.txt" by default). To give a player administrative status simply write their Steam ID on a line in this file. You can write comments after if you want to keep note of the players' handle.
Server administrators will be shown as such on the score board with the icon ![]() . If the server is yours you can also denote yourself as such by placing an asterisk '*' before your Steam ID, for which you will get a tinted icon
. If the server is yours you can also denote yourself as such by placing an asterisk '*' before your Steam ID, for which you will get a tinted icon ![]() . No additional functionality is currently available to owners, it's mainly for show.
. No additional functionality is currently available to owners, it's mainly for show.
Here is an example of how your administrator list file could look:
// Owners/operators
*STEAM_9:1:488201	# Paul (owner)
*STEAM_9:0:38195	# Jane

// Administrators
STEAM_9:0:95482		# Dave
STEAM_9:1:5828645	# Emily
STEAM_9:1:1522834	# sUpErDeAn
STEAM_9:0:864923	# Zamnuzi
You do not have to include your Steam ID if you are only going to be running a listen server (i.e. for a temporary map test session). As a player hosting a listen server, you are automatically given the ownership status.
The only administrative functionality built-in currently provided is the ability to use cheat commands, primarily because this feature is fairly new to the game. We will be including more functionality in future releases, however our scripting platform is able to determine if a player is an administrator or owner. Anyone can write a server plug-in script to boost the functionality available without a complicated permissions base.
Server commands
Sven Co-op has server commands that can be used to manage servers better. Some of these are simply CVAR's you can change at run time, while others are pure commands.
| Command | Parameters | Description |
|---|---|---|
| kicksteamid | "Steam ID" | Kicks a players based on their Steam ID case-insensitively. You must surround the Steam ID with quotes. |
| mp_nextmap_cycle | Map name | Sets the next map for the server. Players will see this in the score board only after their next respawn. |
Cheat commands
The cheat commands built-in to Sven Co-op can only be used under certain conditions:
- If the server is for Internet players, it cannot have a maximum capacity of more than 3 players -- LAN servers do not have this restriction.
- If CVAR "sv_cheats" is 1 anybody can use cheat commands.
- If CVAR "sv_cheats" is 2 only server administrators can use cheats, and will not be subject to the server capacity restriction.
- If CVAR "sv_cheats" is 255 anybody can use engine diagnostic settings (such as gl_wireframe) even in a multi-player game.
If a cheat command is attempted and these conditions are not met the player is told why, and the server will log this event (or print it in the console if logging is disabled).
Cheat commands are useful for private testing sessions, particularly for map authors as they provide some useful controls and limited debugging capabilities. If this is for you we advise you check the provided file "map_test.cfg" as this contains a range of command aliases and bindings to help you do this.
Here is a list of cheat commands currently available:
| Command | Parameters | Description |
|---|---|---|
| Basic modes | ||
| godmode | 0 = disable 1 = enable |
Enable or disable god mode. You will be immune to all damage against your health, but not HEV battery. A map entity can still forcibly kill you, and the kill command will still function as normal. |
| cl_noclip | 0 = disable 1 = enable |
Enable or disable no-clipping mode. You will be flying instead of walking, and can move through solid matter like a ghost. You will not be non-solid yourself though, meaning NPC's can still touch/damage you, and you will still interact with brush based triggers. |
| cl_notarget | 0 = disable 1 = enable |
Enable or disable non-targetable mode. You will be completely invisible to all NPC's, though they can still hear you (they will try to find you), and can damage you by accident. |
| cl_nonsolid | 0 = disable 1 = enable |
Enable or disable non-solid mode. You will become non-solid like a ghost, thus players, NPC's, and brushes can pass through you without touching/damaging you. If something moves inside you and stays there however, you will be unable to move away as that other object is still solid. You will also not take damage from solid type objects (bullets/blades/etc), but particle type damage (explosions/fire/freeze) will still hurt you. |
| Equipment & status | ||
| give | Weapon/ammo/item name | Give yourself some equipment (weapons, ammo, and items). Names should reflect the entity name of the equipment, for example weapon_shotgun, ammo_rpg, or item_longjump. You cannot use this to obtain item_inventory based items, use the trigger command instead. You can technically give yourself any entity (such as a monster), but be warned the effects can be anything from humorous to catastrophic. |
| giveall impulse 101 |
N/A | Give yourself every weapon in the game with some ammo for it. The minigun and shock rifle are omitted due to their exclusive usage constraint. |
| givepoints | Number | Give yourself score/points. You can use a negative value to deduct points. |
| reviveme | N/A | Revive yourself if you've been killed. You will be revived with half health. |
| healme | N/A | Fully restores your health. |
| chargeme | N/A | Fully charges your HEV suit battery. |
| Map testing/debugging | ||
| teleport | Co-ordinates as X Y Z | Teleport yourself to specific co-ordinates. |
| trigger | Map entity name | Trigger an entity in the map by its target name. This is best avoided for all but map authors, or those with good knowledge of the map in question. You as an entity will be passed to that entity as its activating and calling entity. |
Multiple servers on a single Sven Co-op install
You do not have to have multiple installations of Sven Co-op or Sven Co-op Dedicated Server in order to run multiple game server processes. A single installation can hold multiple configurations, and a set of command line parameters can determine which set to use.
This comes with some pros and cons.
| Advantages | Disadvantages |
|---|---|
|
|
Multi-server configuration is intended for people who want to run multiple game server processes of the same game on a single computer (maybe a large server with many processors) without the hassle of multiple installations. This is very common on game service providers or large clans/guilds.
Fortunately, multi-server configuration is very simple and pretty well implemented -- for 1998. First, navigate to the svencoop folder on your server installation. There will be a folder called servers already. Any files you place in this folder are intended to be shared among all game server processes. Create a sub-folder for each game server process you want to have. There is no limit to how many you can have.
There is already an example set of shared configuration files and a server specific configuration set for you to work from. Start by cloning the example folder.
This diagram shows how your server configurations should be laid out.
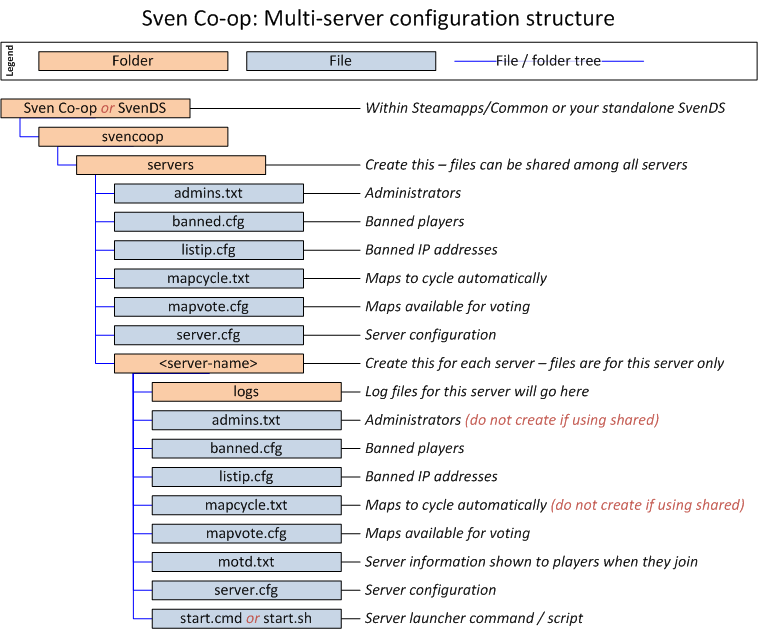
You can actually organise your configurations however you like, but this example is a good way of keeping them tidy.
Each configuration folder will then have it's own set of configuration files inside. You don't have to use all of them, but a unique servercfgfile is pretty much essential. A logs folder will also be needed if you ever intend on using the log files again.
If you intend on using both a server specific and shared file (i.e. banned.cfg) you must use your server-specific servercfgfile to execute each file. You will generally want to execute the shared one first, then the server specific one after. Only configuration files (.cfg) can be shared or bequeathed.
Next all you have to do is sort out your command line parameters to use the profiles you've created. This is very easy to do when running your server as unattended services either manually created or through FireDaemon, ServerDoc, or mEAn Loader. Otherwise make a new file "start.cmd" or "start.sh" in the server's configuration folder and put the command in here instead.
Here are some examples of command line parameters that go after svends.exe (Windows) or ./svends_run (Linux). You must change the working directory to the game server root first.
- -console -port 27015 +maxplayers 12 +servercfgfile "servers/classic_cycle/server.cfg" +logsdir "servers/classic_cycle/logs" +map _server_start +log on
- -console -port 27025 +maxplayers 12 +servercfgfile "servers/custom_cycle/server.cfg" +logsdir "servers/custom_cycle/logs" +map _server_start +log on
- -console -port 27035 +maxplayers 12 +servercfgfile "servers/fun_cycle/server.cfg" +logsdir "servers/fun_cycle/logs" +map _server_start +log on
- -console -port 27045 +maxplayers 6 +servercfgfile "servers/private_test/server.cfg" +logsdir "servers/private_test/logs" +map _server_start +log on
You can also profile other common files such as Metamod's plug-in list (plugins.ini) and AMX mod X's configuration (core.ini). This can be done by adding the following parameters:
- +localinfo mm_pluginsfile "servers/yourprofile/metamod-plugins.ini"
- +localinfo amxx_cfg "servers/yourprofile/amxx-core.ini"
You can then point your AMXX configuration files in the amxx-core.ini to files that sit within your profile folder.
Hopefully you can now understand how multi-server configuration an installation can really help, and how easy it is to set up.
Running a server as a service
Although there is no built-in support for running a Sven Co-op server as a Windows or Linux unattended service you can do this with the aid of a wrapper. These come in various forms, such as scripts, standalone executables, and full utility applications.
Before you begin you absolutely should create a user account on your system to run your service as. No matter which platform you are running, be it a Windows, Linux, or otherwise, you should never run a non-system application in an administrative or super user security context, e.g. "SYSTEM", "LOCAL SERVICE", or "root". Doing this creates a serious security vulnerability on your system.
If you are doing this on Windows firstly bare in mind you will have difficulty doing this on starter or home editions of Windows, because the local security policy management console will not be available to you. You will need to be running the professional, business, enterprise, or ultimate edition of Windows, or any of the Windows Server editions.
To create a service user on Windows:
- Create a standard user account with a sensible name like "SvenDS", but don't forget the password. (You'll need it later.)
- Ensure this user is not in any administrative user groups, such as "Administrators", "Domain Admins", or "Enterprise Admins".
- Configure a local security policy, be it local or domain managed, so that in the user rights assignment section this user is listed within login as a batch job and login as a service.
If you are doing this on Linux simply creating a basic user account will do. Naming it "svends" would be sensible. No further configuration of the user is required. It doesn't even need a password unless you plan to run any command terminals (e.g. Bash over SSH) for management purposes, though as a system administrator you should simply switch yourself to that user via command "sudo -i -u svends" instead.
Windows: FireDaemon Pro
FireDaemon Pro is a utility to make any Windows executable run as if it were a service. Although there are more minimal ways of doing this you will be hard pushed to find such a complete solution packed with features to help you get services up and automate them quickly. Particular advantages include:
- Server will start automatically with Windows without any need to login.
- Server process will be monitored for freezes and unexpected closure, with automatic restart.
- Scheduling of running time and automatic restarting.
- Respond to Windows messages boxes even if the console window is hidden.
- Limit CPU core/thread affinity and priority.
A complete guide for installing SvenDS via SteamCmd and setting up a FireDaemon Pro managed service is available from FireDaemon's knowledge base.
FireDaemon Pro is offered on a 30 day trial basis, though if you run any game server on a full time basis the value of a full license will emerge rapidly. The license model is per server/VM -- you are not limited to the number of services you make/run.
Windows: (mEAn) ServerLoader
(mEAn) ServerLoader is an application designed to get a game server process running as a service with minimal effort. It doesn't offer many features other than this, in fact the only automation will be automatic restart if the server process closes. (No monitoring of frozen processes.)
(mEAn) ServerLoader is offered on a freeware basis. Installation steps are as follows:
- Download (mEAn) ServerLoader.
- Extract the ZIP file to your SvenDS installation area. (A directory "meanloader" will be created within.)
- Using the example configuration file below, create a file called "meanloader.ini" alongside your "server.cfg" file and populate it for your requirements.
- Open a command prompt to the "meanloader" directory.
- Run the following commands:
- meanloader.exe --install
- sc config svends start= auto DisplayName= "Sven Co-op dedicated server" obj= ".\SvenDS" password= TheServiceUserPassword
- sc failure svends reset= 0 actions= restart/60000/restart/60000/restart/60000
- sc description svends "Sven Co-op dedicated server launched via (mEAn) ServerLoader"
Your service will now be installed. To start/stop this service you can either use the services management console, or use the "sc" command, e.g. "sc start svends" or "sc stop svends".
Example configuration file:
[Settings]
ServiceName = svends
RestartInterval = 3000
NumberOfProcesses = 1
ServicePriority = Low
UserInterface = No

[Process_0]
StartDir = C:\SvenDS
ProcessName =
AppName = C:\SvenDS\SvenDS.exe
CommandLine = -console -game svencoop -secure +ip "1.2.3.4" -port 27015 -noipx +maxplayers 12 +log on +map "_server_start"
StartPause = 1000
StopPause = 1000
UserInterface = No
AutoRestart = Yes
Priority = normal
Paused = No
Window = Hide
NumOfRespChecks = 1
PrcFileLogging = No
If you are running multiple servers via configuration profiling you will be required to perform this installation for each individual server configuration profile you have. That means you must extract the utility into each configuration profile directory, as the utility itself does not offer any pointer to an INI file. (The INI file must reside in the same directory as the EXE.)
Be sure to use a different service name and description for each of your server profiles.
While this utility is capable of managing multiple processes, you cannot opt to start/stop/pause specific servers -- it's either all running or none running.
Linux: Bash script
A Debian 8 "Jessie" compatible Bash script can create a service utilising the "screen" utility to keep the process running behind the scenes. This has not been tested with RHEL/CentOS and similar distributions, and is yet to be tested on Debian 9 "Stretch".
The following steps will need to be actioned for each server configuration profile:
- Save file
 service.sh into your server configuration profile directory.
 - Edit your saved "service.sh" file to match the name/path for your server configuration profile. (Mainly the PROFILE_NAME, PROFILE_IP_ADDRESS, PROFILE_PORT, and PROFILE_MAX_PLAYERS variables.)
- Open a command terminal to your server configuration profile directory.
- Make it executable with command "chmod 0750 service.sh".
- Run command "service.sh install" as super user to install your service.
- Run command "service svends-server1 start" as the service user to start your service, replacing "server1" with your server configuration profile name.
You can replace start for one of the following:
- install: Installs the service. (As super user only!)
- uninstall: Stops and un-installs the service. (As super user only!)
- start: Starts the service. (As service user only!)
- restart: Stops and starts the service. (As service user only!)
- stop: Stops the service. (As service or super user.)
- status: Shows if the service is running or not. (As service or super user.)
HTTP downloads for your Sven Co-op server content
 This is implemented outside of our game and are provided only as advice. Therefore, we cannot provide any official support for them. Any help you require should be posted in our server support forum
  , where you may receive assistance from our community.
If you have a server with a very fast Internet connection or on a local area network, then providing fast downloads through HTTP is a must have. A common solution people take is uploading all their custom content to a web host or another location on the same computer. However, like the multi-server configuration advice above, this wastes disk space by duplicating content.
Here I will show you how to set up an Apache web server that serves the same set of files from your single Sven Co-op installation, without leaking your configuration files and logs (which include passwords). The configuration I provide will also allow you to run a regular website off the same Apache instance.
First visit the Apache Software Foundation, download Apache HTTP Server (I'm working with version 2.2.15 for this guide), and install it.
Navigate to your Apache configuration folder (usually at C:\Program Files\Apache Software Foundation\Apache2.2\conf), and open httpd.conf in a text editor.
Here is a similar (but censored/stripped) copy of my configuration. You will need to replace values that are surrounded with curly brackets { } to relate to your server. Obviously ensure you remove the brackets.
Once you've done that, create a new file called httpd-websites.conf in the conf folder. This is where you will define each website that your Apache will host, including Sven Co-op content. The following example includes a regular website and a file pool for any game on your server.
The key things to note about this example configuration is:
- Each site must operate off a different sub-domain (i.e. www.some.host and svencoop.some.host), or you could change to address-based virtual hosts where each site is defined by a different IP address and/or port.
- Like configuration profiles, you still only need Sven Co-op installed once to save time and disk space.
- Only files within sub-folders gfx, maps, models, recommended_sounds, sound, sounds, and sprites inside game folders will be permitted.
- WAD files are also permitted within mod folders.
- Your configuration files (profiled or not) and logs will be denied.
You will need to restart the Apache HTTPD service for configuration changes to take effect. Finally, set your sv_downloadurl to your website with the mod folder (i.e. http://svends.computername/svencoop/ for sub-domain based or http://192.168.0.1:8000/svencoop/ for address/port based) -- the trailing forward slash / is important.
 If you do not have a domain name and do not wish to use your IP address in your sv_downloadurl (perhaps because it's dynamic), you can get a dynamic hostname for free from many dynamic DNS providers that can be mapped to your server for both the game server and web server.